แสดงบทความที่มีป้ายกำกับ tips แสดงบทความทั้งหมด

วันอังคาร, ตุลาคม 11, 2559

วิธีทำให้ OSX 10.12 Sierra อ่าน/เขียน NTFS ได้

เมื่อ​ Apple ออก OS version ใหม่ เราก็ต้องมาหาวิธีทำให้มัน เขียนไฟล์ลงใน drive NTFS กันอีกครา

ในโพสนี้เราก็จะมาทำให้ macOS Sierra มันเขียน drive ที่ format เป็น NTFS ซึ่งใช้กับ Window OS เป็นหลัก วิธีที่เคยใช้กับ Yosimite หรือ El Capitan ใช้ไม่ได้กับ Sierra นะ

วันจันทร์, ตุลาคม 10, 2559

วิธีติดตั้ง macOS Sierra ลง Virtualbox

เมื่อสองสามสัปดาห์ก่อน Apple ออก OS version ใหม่สำหรับเครื่อง Mac, Macbook ปกติผมจะรีบตามอัพเดตตลอด แต่ตอนนี้ไม่รู้ทำไม ไม่มีแรงจูงใจมากพอที่จะอัพเดต OS ของ macbook ที่ตัวเองใช้ทำงานอยู่เลย

อืม...แต่ก็นึกถึง blog วิธีติดตั้ง NTFS ใน El Capitan เพื่อให้เครื่อง Mac อ่าน+เขียน disk ที่ใช้ใน windows ได้ เราจะต้องรีบเพิ่มเนื้อหาสำหรับ mac OS Sierra ซะหน่อย คิดๆว่าทำไงถึงจะเขียนได้โดยยังไม่ต้องอัพเดต OS ในเครื่องตัวเอง เลยได้มาเป็นโพสนี้

วันศุกร์, กรกฎาคม 22, 2559

Tips: ลบข้อมูลที่ฝังอยู่ในภาพถ่าย ด้วยเครื่องแม็ค Remove Exif & GPS location from your photos with Mac (OSX)

    รู้กันหรือเปล่าว่าเวลาเราถ่ายภาพด้วยกล้องดิจิตอล หรือกล้องมือถือภาพของเราจะมีข้อมูลเกี่ยวกับสถานที่ และเกี่ยวกับกล้องที่เราใช้เก็บเอาไว้ ภาษาเทคนิคเค้าเรียก EXIF

    ผมอยากจะเอาภาพบางภาพไปแชร์ในที่สาธารณะ เช่น คราวนี้ ไปซื้อของจากเวบไซต์ Aliexpress มา จะนำภาพสินค้าขึ้นไปในระบบเขา เพราะเราจะได้คะแนนเวลาเราซื้อ และเวลาเราเอาภาพสินค้าขึ้นไป เหมือนเป็นการรีวิวสินค้ากลายๆ ภาพถูกแชร์แบบสาธารณะเลยเป็นห่วงเรื่องความเป็นส่วนตัว (privacy) ต้องหาวิธีลบข้อมูล EXIF ข้างต้น

วันเสาร์, กรกฎาคม 09, 2559

DIY แท่นวาง Macbook และตัวขยายพื้นที่โต๊ะทำงาน จากร้าน Daiso (Daiso hack; Not an Ikea hacks)


    เห็นฝรั่งทางยุโรปเค้ามี Ikea hack กัน คือการเอาสินค้าของ Ikea มาดัดแปลง ไม่ได้ใช้ตามแคตตาล็อก เช่น โต๊ะกาแฟก็มีคนเอามาแขวนผนังแสดงผลงานศิลปแทน เอาตู้กับข้าวมาแปลงเป็นชั้นวางทีวี เป็นต้น

เอ๊..เราก็มีนะแต่เราซื้อของร้านไดโซะ (Daiso) ราคาประหยัด เอามาประยุกต์ใช้ในที่ทำงานเหมือนกัน 

บลอคนี้ขอนำเสนอ Daiso hack 2 อย่าง 

วันเสาร์, พฤษภาคม 14, 2559

มารู้จัก โนวลิ่ง (Knolling) ศิลปการจัดวางข้าวของอันน่าทึ่ง

มารู้จัก โนวลิ่ง (Knolling) ศิลปการจัดวางข้าวของอันน่าทึ่ง

poster

มันเนื่องมาจากเมื่อคืนก่อนเปิดไปเจอ รายการของ Adams Savage อดีตพิธีกรรายการชื่อดัง Myth Buster ทาง Discovery Channel เค้ามาต่อ LEGO custom made ชุดนึงซึ่งต้องใช้ชิ้นส่วนทั้งหมด 1300 กว่าชิ้น ซึ่งมันเยอะมาก

พิธีกรทั้งสองคนจึงพูดกันว่าขั้นตอนแรกจะต้องทำ”โนวลิ่ง”ก่อน !? คุณอดัมเค้าก็อธิบายคร่าวๆอยู่ เหมือนกัน แต่มันยังสงสัยอยู่ เลยต้องไปค้นต่อ...

tested screenshot

วันพุธ, เมษายน 20, 2559

รู้มั้ย? เมื่อไหร่แบตเตอรี่ Macbook จะหมดอายุ | How do you know when your macbook battery is dying

poster

เมื่อไม่นานนี้เอง มีโอกาสได้เปิดฝาเครื่อง macbook 2 เครื่อง เพื่อถอด SSD drive จากเครื่องนึง ไปยังอีกเครื่องนึง แล้วเลยไปสังเกตเห็นว่าแบตเตอรี่มันปูดแล้ว เป็นภาพที่น่ากลัว..แต่ไม่ได้ถ่ายภาพไว้

วันพุธ, มีนาคม 16, 2559

สรุปวิธี สร้างและเพิ่ม SSH key ไปใส่ใน git hosting Github, Gitlab, Bitbucket

ตอนนี้มี Git hosting มาให้เลือกใช้มากมาย ที่งานใช้งานบ่อยๆ ช่วงนี้ก็มี

2 ตัวหลังนี่ใช้บ่อยมาก เพราะให้เราสร้าง private project ได้ ไม่จำกัด (ไปจำกัดเรื่องอื่นแทน เช่น จำนวน user/repo, ขนาดของ repo)

สำหรับการใช้งาน git repository ทุกที่ข้างต้น เราจะต้องมี ssh key แลกกับ server เค้า บันทึกนี้จะเป็นขั้นตอนที่ผมทำเวลาสร้าง ssh key ซึ่งปกติเค้าก็จะทำกันครั้งเดียวแหละ เว้นเสียแต่ว่าเราจะทำ ssh key หาย ซึ่งจะทำให้เรา push source code ขึ้นไปไม่ได้

วันศุกร์, กุมภาพันธ์ 12, 2559

แชร์เนื้อหา blogger ให้สวยงามใน timeline ด้วย Twitter card และ Facebook Open Graph

poster

ปีนี้อยากจะเขียน blog ให้เยอะๆ พอเริ่มเขียนเยอะเข้าก็เจอเรื่องขัดใจที่ว่า เวลา share เนื้อหาใน twitter หรือ facebook แล้ว ทำไม URL เรามันไม่แสดงสวยๆเหมือนที่คนอื่นเค้าทำกัน ค้นไปค้นมา อ๋อ มันมี keyword เราต้องใช้ Twitter Card และ Facebook Open Graph

ใน Blogger มันมี widget ให้ใช้แต่มันก็เหมือนว่าจะไม่สมบูรณ์ ไม่เหมือน plugin ที่ Wordpress เค้ามีฝังมาให้ใน theme จริงๆแล้วเราต้องเพิ่ม meta information พวกนี้เอง เรามาดูกันว่าทำยังไง ใน blogger platform

วันพฤหัสบดี, พฤษภาคม 14, 2558

OSX: เปลี่ยน JDK version ง่ายด้วยคำสั่งเดียว; Switch JDK version easily in one command.


    เครื่อง macbook ของผมติดตั้ง Java (JDK) เอาไว้ 3 version 1.6, 1.7 และ 1.8 โปรแกรมที่พัฒนาตัวไหนเก่าหน่อยก็ต้องใช้ JDK 6 ถ้าใหม่ขึ้นมาอีกหน่อยก็จะใช้ JDK 7 สำหรับ  project ที่จะทำต่อจากนี้ก็จะเริ่มที่ JDK 8 เลย เพราะ JDK 6, JDK 7 มัน end of life ไปแล้ว, Oracle เลิก support แล้ว

ถ้าอยากรู้ว่าตอนนี้ macbook เราติดตั้ง JDK อะไรไว้บ้าง ใช้คำสั่งนี้

$ /usr/libexec/java_home -V


Matching Java Virtual Machines (5):

1.8.0_45, x86_64: "Java SE 8" /Library/Java/JavaVirtualMachines/jdk1.8.0_45.jdk/Contents/Home

1.8.0_31, x86_64: "Java SE 8" /Library/Java/JavaVirtualMachines/jdk1.8.0_31.jdk/Contents/Home

1.7.0_25, x86_64: "Java SE 7" /Library/Java/JavaVirtualMachines/jdk1.7.0_25.jdk/Contents/Home

1.6.0_65-b14-462, x86_64: "Java SE 6" /Library/Java/JavaVirtualMachines/1.6.0.jdk/Contents/Home

1.6.0_65-b14-462, i386: "Java SE 6" /Library/Java/JavaVirtualMachines/1.6.0.jdk/Contents/Home


เราสามารถให้มันแสดง JAVA_HOME ของแต่ละ version ออกมาได้ด้วยคำสั่งแบบนี้ 

$ /usr/libexec/java_home -v 1.6

/Library/Java/JavaVirtualMachines/1.6.0.jdk/Contents/Home

เปลี่ยนเลข 1.6 เป็น version ที่ต้องการ ในกรณีในเครื่องผม เลขที่ใส่ได้ก็จะมี 1.6 1.7 หรือ 1.8

จากคำสั่งแบบนี้ ทำให้เราสามารถเซ็ต variable JAVA_HOME ให้กับแต่ละ project ที่เราใช้ได้
...
export JAVA_HOME=$(/usr/libexec/java_home -v 1.8)
...

แล้วก็พบว่า ใน macbook แค่เราเปลี่ยน variable JAVA_HOME เวลาเรา execute java มันก็จะเป็น version ตาม JAVA_HOME เลย

เปลี่ยน JDK version ง่ายด้วยคำสั่งเดียว

ถ้าอยากทำคำสั่งให้เปลี่ยน JDK version ง่ายๆ ก็ใช้วิธีกำหนด alias เอาไว้
จะสร้างไฟล์ ~/.profile หรือ ~/.zshrc ถ้าคุณใช้ ohmyzsh เหมือนผม

ใส่ 3 บรรทัดนี้เข้าไป
...
alias jdk6="export JAVA_HOME=\$(/usr/libexec/java_home -v 1.6);echo '... Using JDK 6'"
alias jdk7="export JAVA_HOME=\$(/usr/libexec/java_home -v 1.7);echo '... Using JDK 7'"
alias jdk8="export JAVA_HOME=\$(/usr/libexec/java_home -v 1.8);echo '... Using JDK 8'"
...

พิมพ์คำสั่งนี้ เพื่อเริ่มใช้งาน alias ที่เพิ่งเพิ่มเข้าไปได้เลย

$ . ~/.zshrc

หรือ 

$ . ~/.profile

เวลาต้องการเปลี่ยน JDK version ก็แค่ execute command jdk6, jdk7 หรือ jdk8

$ jdk8
... Using JDK 8
$ java -version
java version "1.8.0_45"
Java(TM) SE Runtime Environment (build 1.8.0_45-b14)
Java HotSpot(TM) 64-Bit Server VM (build 25.45-b02, mixed mode)

$ jdk7
... Using JDK 7
$ java -version
java version "1.7.0_25"
Java(TM) SE Runtime Environment (build 1.7.0_25-b15)
Java HotSpot(TM) 64-Bit Server VM (build 23.25-b01, mixed mode)

$ jdk6
... Using JDK 6
$ java -version
java version "1.6.0_65"
Java(TM) SE Runtime Environment (build 1.6.0_65-b14-462)
Java HotSpot(TM) 64-Bit Server VM (build 20.65-b04-462, mixed mode)

... Happy coding ^ ^

วันพุธ, มิถุนายน 04, 2557

Tips: How to find all column name according to the prefix or postfix using SQLDeveloper

Using SQLDeveloper find all column name according to the prefix or postfix

1. Open the Reports View
  View > Reports
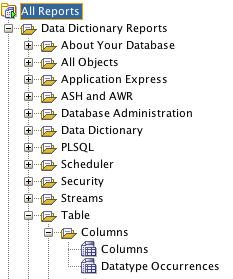
2. Navigate to the menu Columns
  All Reports > Data Dictionary Reports > Table > Columns

3. Double click on Columns menu
4. It will ask for a connection, for this action.

5.Then ask for The Bind Values for Table, Column name choose default, by click Apply

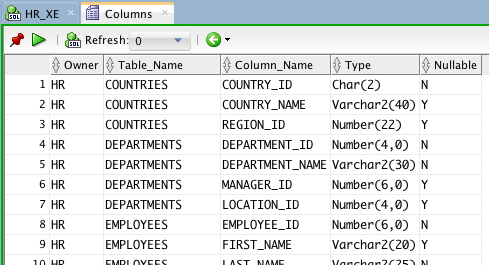
6. A report will opened

7. Click SQL button to edit
8. The new worksheet opened. We will modify script between line 27-28.
In the picture I already insert a new line at line 28.

9. We will add additional where expression to filter only the column that match our prefix or postfix.

i.e.:
```
and column_name like '%_ID' 
```


10. Click Run button

11. We will see the result

Easy, right. :)


วันศุกร์, มีนาคม 15, 2556

youtube-dl recipe: รวมคำสั่งโหลด Youtube video มาเก็บไว้ดู

ตั้งชื่อตอนว่า Youtube-dl Recipe; รวมสูตรคำสั่งของ youtube-dl

    youtube-dl เป็นโปรแกรมเขียนด้วยภาษา python เอาไว้ดาวโหลด youtube video  มาเก็บเอาไว้เป็นไฟล์ flv หรือ mp4; ประโยชน์ที่ผมชอบมัน 
  1. ดูซ้ำได้โดยไม่ต้อง online
  2. ดูแบบลื่นไหลไม่สะดุด
  3. แถมยังหากเป็นไฟล์ที่มี cc (close caption) หรือ ซับไตเติ้ล (subtitle) ก็ยังโหลดมาเป็นไฟล์ .srt เล่นแบบแสดง subtitle ได้ด้วย 
   ตัวโปรแกรม youtube-dl เป็น open source โหลดได้จาก github.com/rg3/youtube-dl ตัวมันรันได้ทุก platform (Windows, Linux, Mac OSX) ที่มี/ติดตั้ง python 2.6 ขึ้นไปเอาไว้ 

คำสั่งที่ผมชอบใช้ 

1.โหลดที่ละหลายๆเรื่อง
    โหลด youtube โดยเอา URL ใส่ไว้ใน text file (ep12.txt) ใช้ในกรณีอยากโหลดละคร(series) ที่ upload เป็นหลายๆส่วน (เช่น 1/7- 7/7)
$python youtube-dl.py -v --format 18 -o '%(title)s.%(ext)s' --batch-file <file>

ตัวอย่าง  
$python youtube-dl.py -v --format 18 -o '%(title)s.%(ext)s' --batch-file <file>

--format 
    ใส่เลข itag; คือ format ของ video ที่เราต้องการ ดูรายละเอียดได้จาก wikipedia Youtube
ที่ผมชอบใช้ ถ้าเป็นละครทีวีไทย ใช้ 18 ก็พอ ถ้าเป็นพวกไฟล์ keynote ของตปท.หรือ music video ก็จะใช้ 22 หรือ 37
tag = Container | Video Resolution | Video encoding| Audio encoding
18 = mp4 | 270p/360p | H.264| AAC
22 = mp4 | 720p | H.264| AAC
37 = mp4 | 1080p | H.264| AAC

-o
บอกมันว่าจะ save แล้วตั้งชื่อไฟล์อย่างไร %(title)s.%(ext)s คือใช้ชื่อเรื่องของ youtube นั้นแล้ว ext ก็เป็นไปตาม itag ที่เลือก

--batch-file <ep12.txt>
บอกว่าให้ไปดู URL จาก file ที่ให้ไปโดยเนื้อหาข้างในก็เป็น 1 URL 1 บรรทัด

2.โหลดแบบเอา subtitle ด้วย
$python youtube-dl.py --format <##> -o %(title)s.%(ext)s --write-srt URL
ตัวอย่าง 
$python youtube-dl.py --format 22 -o %(title)s.%(ext)s --write-srt vXTXmq5z2tM
--write-srt
บอกให้มัน save subtitle หรือ cc มาให้ด้วย,ถ้ามี

3.โหลดแบบ simple simple 
ใช้ค่า default ทุกอย่าง
$python youtube-dl.py URL
ตัวอย่าง
$python youtube-dl.py vXTXmq5z2tM

Note: 
  • ถ้ารันบน OSX parameter -o ต้องใส่ single quote ครอบด้วย เช่นนี้ -o '%(title)s.%(ext)s'
  • URL ไม่ต้องมี http:// หรือ youtube.com เอา id ของมันมาใส่ได้เลย หากดาวโหลดจาก youtube อยู่แล้ว 
  • ถ้าใช้ linux หรือ osx ทำ alias ไว้เลยครับ เช่น
    alias youtube-dl='python ~/script/youtube-dl/youtube-dl.py'
  • ถ้าวัันดีคืนร้าย รันแล้วไม่ยอมโหลดให้ลอง update program ดูก่อนใช้คำสั่ง
    $youtube.dl -U

ลองหาอ่านเพิ่มเติมได้ที่ https://github.com/rg3/youtube-dl/#readme
หรือจะพิมพ์ youtube-dl -h ก็ได้ ^^

PS. If you want to read Thai please try to use Google Translate. (I embedded the tools, find it on the right.

วันพฤหัสบดี, พฤศจิกายน 15, 2555

Ubuntu: Solving conky did not display on gnome-shell 3.6

Conky, conky lua script that dowloaded from gnome-look did not display any graphics on gnome-shell.

To fix; we need to edit the Conky's config file a.k.a. .conkyrc file


Replace own_window_type override with following lines:

own_window_type normal
...
You might add this line if your script did not have it.
own_window_argb_visual yes
...

Finish? then
killall conky 

then execute conky again, now it should display the graphics


Reference: http://askubuntu.com/a/139867

Bonus, nice conky theme

วันศุกร์, พฤศจิกายน 02, 2555

Ubuntu, 12.10, gnome-shell; Move window buttons back to the left side

HOWTO move the window buttons in gnome-shell to the left side


    I love the Ubuntu button on the left side but after install&setup the 12.10, they move the buttons back to the right.

   So, I searching/googling I use gnome-shell and the gconf method didnot work anymore I know I have to user dconf editor.

There's many many more, but use same command and it did not work on my machine.

Just excute this command in a terminal
$gsettings set org.gnome.desktop.wm.preferences button-layout close,maximiez,minimize:

Or use dconf editor; Well, install the dconf editor.
$sudo apt-get install dconf-tools

Open it go to/navigate to org/gnome/desktop/wm/preferences, change the value of button-layout to :minimize,maximize,close

If you're like mine it will not work! buttons still there, on the right did not moved :(

Here's how
navigate to this instead: org/gnome/shell/overrides/ change the value of button-layout to :minimize,maximize,close 

button are now on the left side

Gotcha! I'm a happy man now :) Have a good day!

วันพุธ, มิถุนายน 13, 2555

Ubuntu on SSD; application tuning for best performance

Ubuntu on SSD

Tuning application's cache/temp directory for best performance.

    From previous post running-ubuntu-on-ssd-tweak. We already have instruction on howto move Firefox's cache to RAM, the tmpfs. This post will show howto do it with others.

Google Chrome

Change execute parameter in Google Chrome launcher file.
$sudo vi /usr/share/applications/google-chrome.desktop 

...
# Exec=/opt/google/chrome/google-chrome %U
Exec=/opt/google/chrome/google-chrome --disk-cache-dir="/tmp/" %U

...

duplicate old line then comment it. put additional parameter to a duplicated line; --disk-cache-dir="/tmp/" 

If you want to specify the cache size see the reference.

reference:
  1. http://www.ghacks.net/2010/10/19/how-to-change-google-chromes-cache-location-and-size/ 
  2. http://www.joeyconway.com/blog/2011/09/11/ubuntu-ssd-move-chrome-cache-to-ram/

Running Ubuntu on SSD; tweak & configuration for best performance

Ubuntu on SSD 

tweak & configuration for best performance


Start with 1st, 2nd reference (1, 2)

Modify the /etc/fstab & I/O scheduler 
 # <file system> <mount point>   <type>  <options>       <dump>  <pass>
proc            /proc           proc    nodev,noexec,nosuid 0       0
tmpfs        /tmp        tmpfs        nodev,nosuid,noatime,mode=1777 0    0
# / was on /dev/sda1 during installation
UUID=338c2a9f-8a5f-4e4e-90c5-30d02a7680c5 /               ext4    defaults,noatime,discard,errors=remount-ro 0       1
# /home was on /dev/sdb5 during installation
UUID=68f602b9-5384-4be2-8b7a-cbc1001504d2 /home           ext4    defaults        0       2
# swap was on /dev/sda5 during installation
# ram 8G no need swap
# UUID=2b531fb1-b9fc-4653-859a-58af74951a2c none            swap    sw              0       0
Automatic TRIM  (3)
is supported since kernel 2.6.33 with the EXT4 file system
For automatic TRIM to work, the drive needs to be mounted with the "discard" option in fstab.
...
# / was on /dev/sda1 during installation
UUID=338c2a9f-8a5f-4e4e-90c5-30d02a7680c5 /               ext4    defaults,noatime,discard,errors=remount-ro 0       1
...

Modify /etc/rc.local (1, 2)
...
echo deadline > /sys/block/sda/queue/scheduler
echo 1 > /sys/block/sda/queue/iosched/fifo_batch
...
exit 0
Modify applications (4)
    Firefox puts its cache in your home partition. By moving this cache in RAM you can speed up Firefox and reduce disk writes. Complete the previous tweak to mount /tmp in RAM, and you can put the cache there as well.

Open about:config in Firefox. Right click in an open area and create a new string value called browser.cache.disk.parent_directory. Set the value to /tmp.

reference:

  1. http://askubuntu.com/a/86474
  2. http://itezer.com/blog/ubuntu-linux/125-four-tweaks-for-using-ubuntu-with-ssd.html
  3. TRIM http://askubuntu.com/questions/18903/how-to-enable-trim 
  4. http://tombuntu.com/index.php/2008/09/04/four-tweaks-for-using-linux-with-solid-state-drives/ 

วันศุกร์, กันยายน 02, 2554

tar everything except the files (or some of files)

Using this command when want to tar everything in a folder except some of the files (binary files)


# tar -cjvf ../packed_no_bin.tar.bz2 * --exclude=*.gz --exclude=*.bin --exclude=*.rpm

if there's another file type that didn't want to tar just put another
--exclude=<pattern>

วันอังคาร, พฤษภาคม 03, 2554

Ubuntu/linux: Speedup SCP file transfer


put additional argument into scp command line

scp -c arcfour filename.txt host:/path/filename

"Overall arcfour performed better than any other cypher used. It is safe to say thatar cfo ur can be
used to transfer files usingscp on an internal network.
You can define which cypher to use by-c option of scp ."

วันอังคาร, เมษายน 26, 2554

Ubuntu: Modify AWN to show Chrome's app dock icons more precisely.

When make a shortcut to Chrome application on AWN dock. the icon didnot change to their favicon or our customized icon.

    This is how to do that :-
i.e.:
chromium-browser --user-data-dir=~/.gmail --app=http://www.gmail.com --class=Gmail $*

Explanation
chromium-browser < Chrome executable >
--user-data-dir="< data directory for an app (linuz's) usually is $HOME/.config/google-chrome >"
--app="< URL of an app e.g.: https://docs.google.com/#home" >"
--class="< Name that make this shortcut unique e.g.: Docs $* >"

e.g.:
/usr/bin/chromium-browser --user-data-dir="/home/xample/.config/google-chrome/Default" --app="https://docs.google.com/#home" --class="Docs $*"