วันศุกร์, พฤศจิกายน 07, 2557

เครื่องมือต่างๆสำหรับนักพัฒนาซอฟต์แวร์ยุค 201x ควรรู้จักไว้

เครื่องมือต่างๆสำหรับนักพัฒนาซอฟต์แวร์ยุค 201x ควรรู้จักไว้

มาบันทึกเอาไว้มีทั้งฟรี ทดลองใช้ ไม่ฟรี 

Fabric.io "Mobile Development, Solved."
เครื่องมือต่างๆ สำหรับการพัฒนา mobile application 
  • Crashlytics, ตัวจัดการ runtime exception
  • Twitter Integration
  • Mopub,​ ตัวจัดการ Ads
  • SMS confirmation service.
Github for Edu "The best developer tools, free for students"
ถ้าเป็นนักศึกษาหรือคนในแวดวงก็จะใช้บริการได้ในราคาพิเศษ หรือฟรีเลย


อื่นๆ อีกมากมาย
จะทยอยมาอัพเดตเรื่อยๆ
 ---
ครั้งที่ 1 : 7/11/2014

วันอาทิตย์, ตุลาคม 19, 2557

OSX: วิธีทำให้ OSX 10.10 Yosemite อ่าน/เขียน NTFS ได้

ทำ OSX 10.10 Yosemite อ่าน/เขียน NTFS ได้ ไม่ต้อง crack app 

มันยาวนะถ้าอยากอ่านก็ไม่ว่ากัน
TL;DR if so rushing skip to The Solution

ถ้ามองหา วิธีอ่าน/เขียน NTFS สำหรับ El Capitan (OS X 10.11) มาทางนี้เลยครับ :)

ตอนได้ใช้ OSX Mavericks 10.9 ลง driver ให้ osx เขียน ntfs ได้ด้วย blog นี้

 http://fernandofig.wordpress.com/2011/08/08/ntfs-write-support-on-osx-lion-with-ntfs-3g-f/
 จากหัวข้อ Fuse4x + NTFS-3G from MacPorts เค้าใช้ macports แต่ตอนนี้ผมเปลี่ยนมาใช้ homebrew ซะแล้ว เกรงว่ามันจะตีกัน ไม่อยากลงทั้ง port และ brew

จึงเสาะหาวิธีใหม่

มาเจออันนี้ ใช้ brew ล้วนๆ
  http://coolestguidesontheplanet.com/how-to-write-to-a-ntfs-drive-from-os-x-mavericks/
  แต่ติดปัญหาว่าการ compile osxfuse ที่เป็น dependency ของ ntfs-3g ใน brew นั้น มันต้องการ library บางตัวที่มากับ XCode 6.1 ซึ่ง ณ เวลาที่เขียน xcode 6.1 ยังไม่เป็น GA คือยังโหลดไม่ได้ผ่าน AppStore เลยลองไปโหลด binary ของ osxfuse 2.7 มา ติดตั้งได้ไม่มีปัญหา ถึง brew จาก compile และติดตั้ง ntfs-3g ให้ได้ แต่ก็ใช้ไม่ได้ กลายเป็น mount ntfs partition ไม่ได้เลย

เกือบจะตัดใจเสียเงินซื้อ Paragon NTFS for Mac OS X ซะแล้ว ลอง google อีกครั้ง

The Solution -- มาประสบความสำเร็จด้วย post นี้ครับ

  http://www.macbreaker.com/2014/06/how-to-enable-writing-to-ntfs-hard.html

0 ซอฟต์แวร์ที่ใช้ติดตั้งใน step ทั้งหมดนี้ ผม pack ไว้ที่ dropbox ส่วนตัว ที่นี่

1 ดาวโหลด OSXFUSE 2.7.1 ได้จาก http://osxfuse.github.io/ และติดตั้ง
2 *สำคัญ ตอนติดตั้งให้เลือกติดตั้ง MacFUSE Compatibility Layer ด้วย
 

3 ดาวโหลด NTFS-3G for Mac OS X ได้จาก http://goo.gl/5AIE4i
เลขปีมันเก่าหน่อย (ตั้งแต่ 2010) แต่ใช้ได้นะ

4 สังเกตว่าตอนติดตั้ง ntfs-3g เราจะเลือกเป็น No caching

5 ตัวสุดท้าย fuse_wait ดาวโหลดได้จาก https://github.com/bfleischer/fuse_wait/downloads และติดตั้ง

6 เมื่อติดตั้งเรียบร้อย ก็เสียบ HDD, flashdrive ที่เป็น ntfs ทดสอบ อ่านเขียนได้เลย work แน่นอน

7 เรียบร้อย ประหยัด และไม่ได้ละเมิดลิขสิทธิ์ใครด้วย

Note: captured screen was copied from the macbreaker.

UPDATE: พฤษภาคม 2015
    comment ทิ้งไว้ได้ มันจะไม่ขึ้นทันที ผมจะเห็นทาง gmail เห็นแล้วจะรีบมาตอบ,ถ้ารู้ทางแก้ไข นะครับ ขอบคุณทุกท่าน


วันจันทร์, กันยายน 29, 2557

Fixing bug Shellshock, Aftershock แก้ไขบั๊ก shellshock, aftershock บน OSX

จากข่าวนี้ พบบั๊กร้ายแรงใน Bash ทุกรุ่น ทุกคนควรอัพเกรดด่วน

วิธีตรวจสอบว่าเราโดนเข้าแล้วรึเปล่า

ตรวจสอบ Shellshock (CVE-2014-6271)
 - เปิด Terminal ขึ้นมา 
 - พิมพ์คำสั่งเหล่านี้ กด enter เพื่อทดสอบ

env x='() { :;}; echo vulnerable' bash -c "echo this is a test"


ถ้าได้ผลแบบนี้ แสดงว่าปลอดภัยจาก bug นี้

bash: warning: x: ignoring function definition attempt
bash: error importing function definition for `x'

this is a test

ถ้าได้แบบนี้ มีคำว่า vulnerable แสดงว่ายังไม่ปลอดภัยจาก bug นี้ 

vulnerable

this is a test


ตรวจสอบ Aftershock (CVE-2014-7169)

 - พิมพ์คำสั่งเหล่านี้ กด enter เพื่อทดสอบ

env var='() {(a)=>\' bash -c "echo date"; cat echo; rm -f echo

ถ้าได้ผลแบบนี้ แสดงว่าปลอดภัยจาก bug นี้

bash: var: line 1: syntax error near unexpected token `='
bash: var: line 1: `'
bash: error importing function definition for `var'
date
cat: echo: No such file or directory

ถ้าได้แบบนี้ มี วันที่เดือนปี แสดงว่ายังไม่ปลอดภัยจาก bug นี้

bash: var: line 1: syntax error near unexpected token `='
bash: var: line 1: `'
bash: error importing function definition for `var'
Fri Sep 26 09:20:00 UTC 2014


ถ้าใช้ OSX homebrew อยู่แล้ว  สามารถอัพเดต repository เอา bash ตัวที่แก้ไขแล้วมาได้เลย ง่ายๆ
$ brew update
$ brew install bash

หลังจากได้ bash version ที่แก้ bug พวกนี้มาแล้วให้ทำสร้าง symbolic link ให้ osx มาใช้ bash ตัวใหม่ที่มากับ brew 

Backup ของ original ไว้ อุ่นใจ

$ sudo mv /bin/bash /bin/bash_old
$ sudo mv /bin/sh /bin/sh_old

สร้าง link ไปยัง OSX system ให้มันมาใช้ bash ที่ได้จาก brew

$ sudo ln -s /usr/local/Cellar/bash/4.3.25/bin/bash /bin/bash
$ sudo ln -s /usr/local/Cellar/bash/4.3.25/bin/bash /bin/sh


Reboot OSX สักครั้งเพื่อความสบายใจ จริงๆเรียกใช้งาน bash ครั้งต่อไปก้อจะถูกเรียกจาก binary ตัวใหม่ที่เรา upgradeไปแล้ว 


Reference:

  • https://wiki.bitnami.com/security/2014-09-25_Critical_security_issue_in_bash_CVE-2014-6271_CVE-2014-7169?vero_conv=272180757
  • http://security.stackexchange.com/questions/68202/how-to-patch-bash-on-osx-in-wake-of-shellshock/68250#68250


วันเสาร์, กันยายน 13, 2557

Bumblebee Transformers: แกะกล่อง + ประกอบ diamond block, LOZ (nanoblock จีน)

แกะกล่อง + ประกอบ diamond block, LOZ (nanoblock จีน)


ภาพกล่องสินค้า


Bumblebee จากเรื่อง Transformers
รหัส 9401 
จำนวนชิ้น 240 ชิ้น  

ภาพจริงเมื่อต่อเสร็จ


ต่อจนเสร็จแต่ไม่ได้นับว่าใช้ 240 ชิ้นจริงหรือเปล่า แต่จะมีเศษเหลือตามนี้ครับ 


Megatron, Transformers: แกะกล่อง + ประกอบ diamond block, LOZ

แกะกล่อง + ประกอบ diamond block, LOZ (nanoblock จีน) 


ภาพกล่องสินค้า
Megatron จากเรื่อง Transformers
รหัส 9403 
จำนวนชิ้น 270 ชิ้น  

ภาพจริงเมื่อต่อเสร็จ 


ต่อจนเสร็จแต่ไม่ได้นับว่าใช้ 270 ชิ้นจริงหรือเปล่า แต่จะมีเศษเหลือตามนี้ครับ 


วันพุธ, มิถุนายน 04, 2557

Tips: How to find all column name according to the prefix or postfix using SQLDeveloper

Using SQLDeveloper find all column name according to the prefix or postfix

1. Open the Reports View
  View > Reports
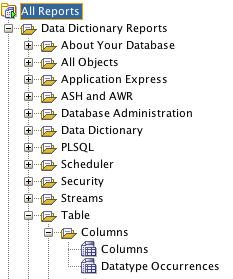
2. Navigate to the menu Columns
  All Reports > Data Dictionary Reports > Table > Columns

3. Double click on Columns menu
4. It will ask for a connection, for this action.

5.Then ask for The Bind Values for Table, Column name choose default, by click Apply

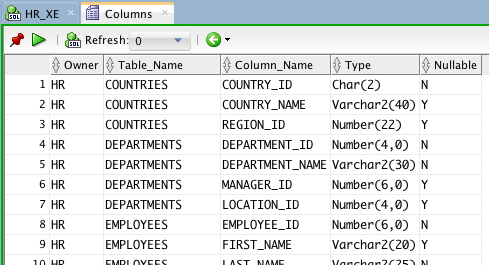
6. A report will opened

7. Click SQL button to edit
8. The new worksheet opened. We will modify script between line 27-28.
In the picture I already insert a new line at line 28.

9. We will add additional where expression to filter only the column that match our prefix or postfix.

i.e.:
```
and column_name like '%_ID' 
```


10. Click Run button

11. We will see the result

Easy, right. :)


วันอังคาร, พฤษภาคม 20, 2557

Fixing libusbx: error [darwin_claim_interface] Using Heimdall 1.4 OSX


When I'm using Heimdall 1.4 for OSX, I got this error 

libusbx: error [darwin_claim_interface] USBInterfaceOpen: another process has device opened for exclusive access
ERROR: Claiming interface failed!
---

full log trace:
$ heimdall flash --kernel recovery.img

Heimdall v1.4.0


Copyright (c) 2010-2013, Benjamin Dobell, Glass Echidna

http://www.glassechidna.com.au/


This software is provided free of charge. Copying and redistribution is

encouraged.


If you appreciate this software and you would like to support future

development please consider donating:

http://www.glassechidna.com.au/donate/


Initialising connection...

Detecting device...

Claiming interface...libusbx: error [darwin_claim_interface] USBInterfaceOpen: another process has device opened for exclusive access

ERROR: Claiming interface failed!

---

Here's how to solve the problem

1. Open the Terminal app

2. Execute command
$ kextstat | grep -v apple 

Index Refs Address            Size       Wired      Name (Version)

   82    0 0xffffff7f80ed6000 0x3000     0x3000     com.devguru.driver.SamsungACMControl (1.4.16) <36 3="" 4="">
   84    0 0xffffff7f80ec0000 0xc000     0xc000     com.devguru.driver.SamsungACMData (1.4.16) <83 36="" 3="" 4="" 5="">
   87    1 0xffffff7f80888000 0x43000    0x43000    org.virtualbox.kext.VBoxDrv (4.2.18) <7 1="" 3="" 4="" 5="">
   88    0 0xffffff7f808d1000 0x8000     0x8000     org.virtualbox.kext.VBoxUSB (4.2.18) <87 1="" 36="" 39="" 3="" 4="" 5="" 7="">
  142    0 0xffffff7f80c8d000 0x11000    0x11000    org.fuse4x.kext.fuse4x (0.9.2) <7 1="" 3="" 4="" 5="">
  143    0 0xffffff7f822d8000 0xa000     0xa000     com.initex.proxifier.macosx.kext (2.11.2) <5 1="" 4="">
  144    0 0xffffff7f822e2000 0x1b000    0x1b000    org.pqrs.driver.KeyRemap4MacBook (9.3.0) <31 1="" 3="" 4="" 5="">
  145    0 0xffffff7f80edc000 0x4000     0x4000     com.devguru.driver.SamsungComposite (1.4.16) <36 3="" 4="">

3. Notice the line that contain "Samsung"

4. Execute these command, to unload those Samsung's line
*execute the command line by line or the command will not working properly

$ sudo kextunload -b com.devguru.driver.SamsungACMControl
Password:

$ sudo kextunload -b com.devguru.driver.SamsungACMData

$ sudo kextunload -b com.devguru.driver.SamsungComposite

5. Try to execute heimdall to flash the recovery again
This time there's no libusbx: error :) 
---
Claiming interface...
Setting up interface...

Initialising protocol...
Protocol initialisation successful.

Beginning session...
---
full log trace:
$ heimdall flash --pit Q1_20110914_16GB.pit --RECOVERY recovery.img --no-reboot
Heimdall v1.4.0

Copyright (c) 2010-2013, Benjamin Dobell, Glass Echidna
http://www.glassechidna.com.au/

This software is provided free of charge. Copying and redistribution is
encouraged.

If you appreciate this software and you would like to support future
development please consider donating:
http://www.glassechidna.com.au/donate/

Initialising connection...
Detecting device...
Claiming interface...
Setting up interface...

Initialising protocol...
Protocol initialisation successful.

Beginning session...

reference: via lum7671 blog via blog.scott.wallace.sh